Saturday, December 15, 2018

Basteltraum's Challenge #72 Shaker card / special shape


Hi everyone!

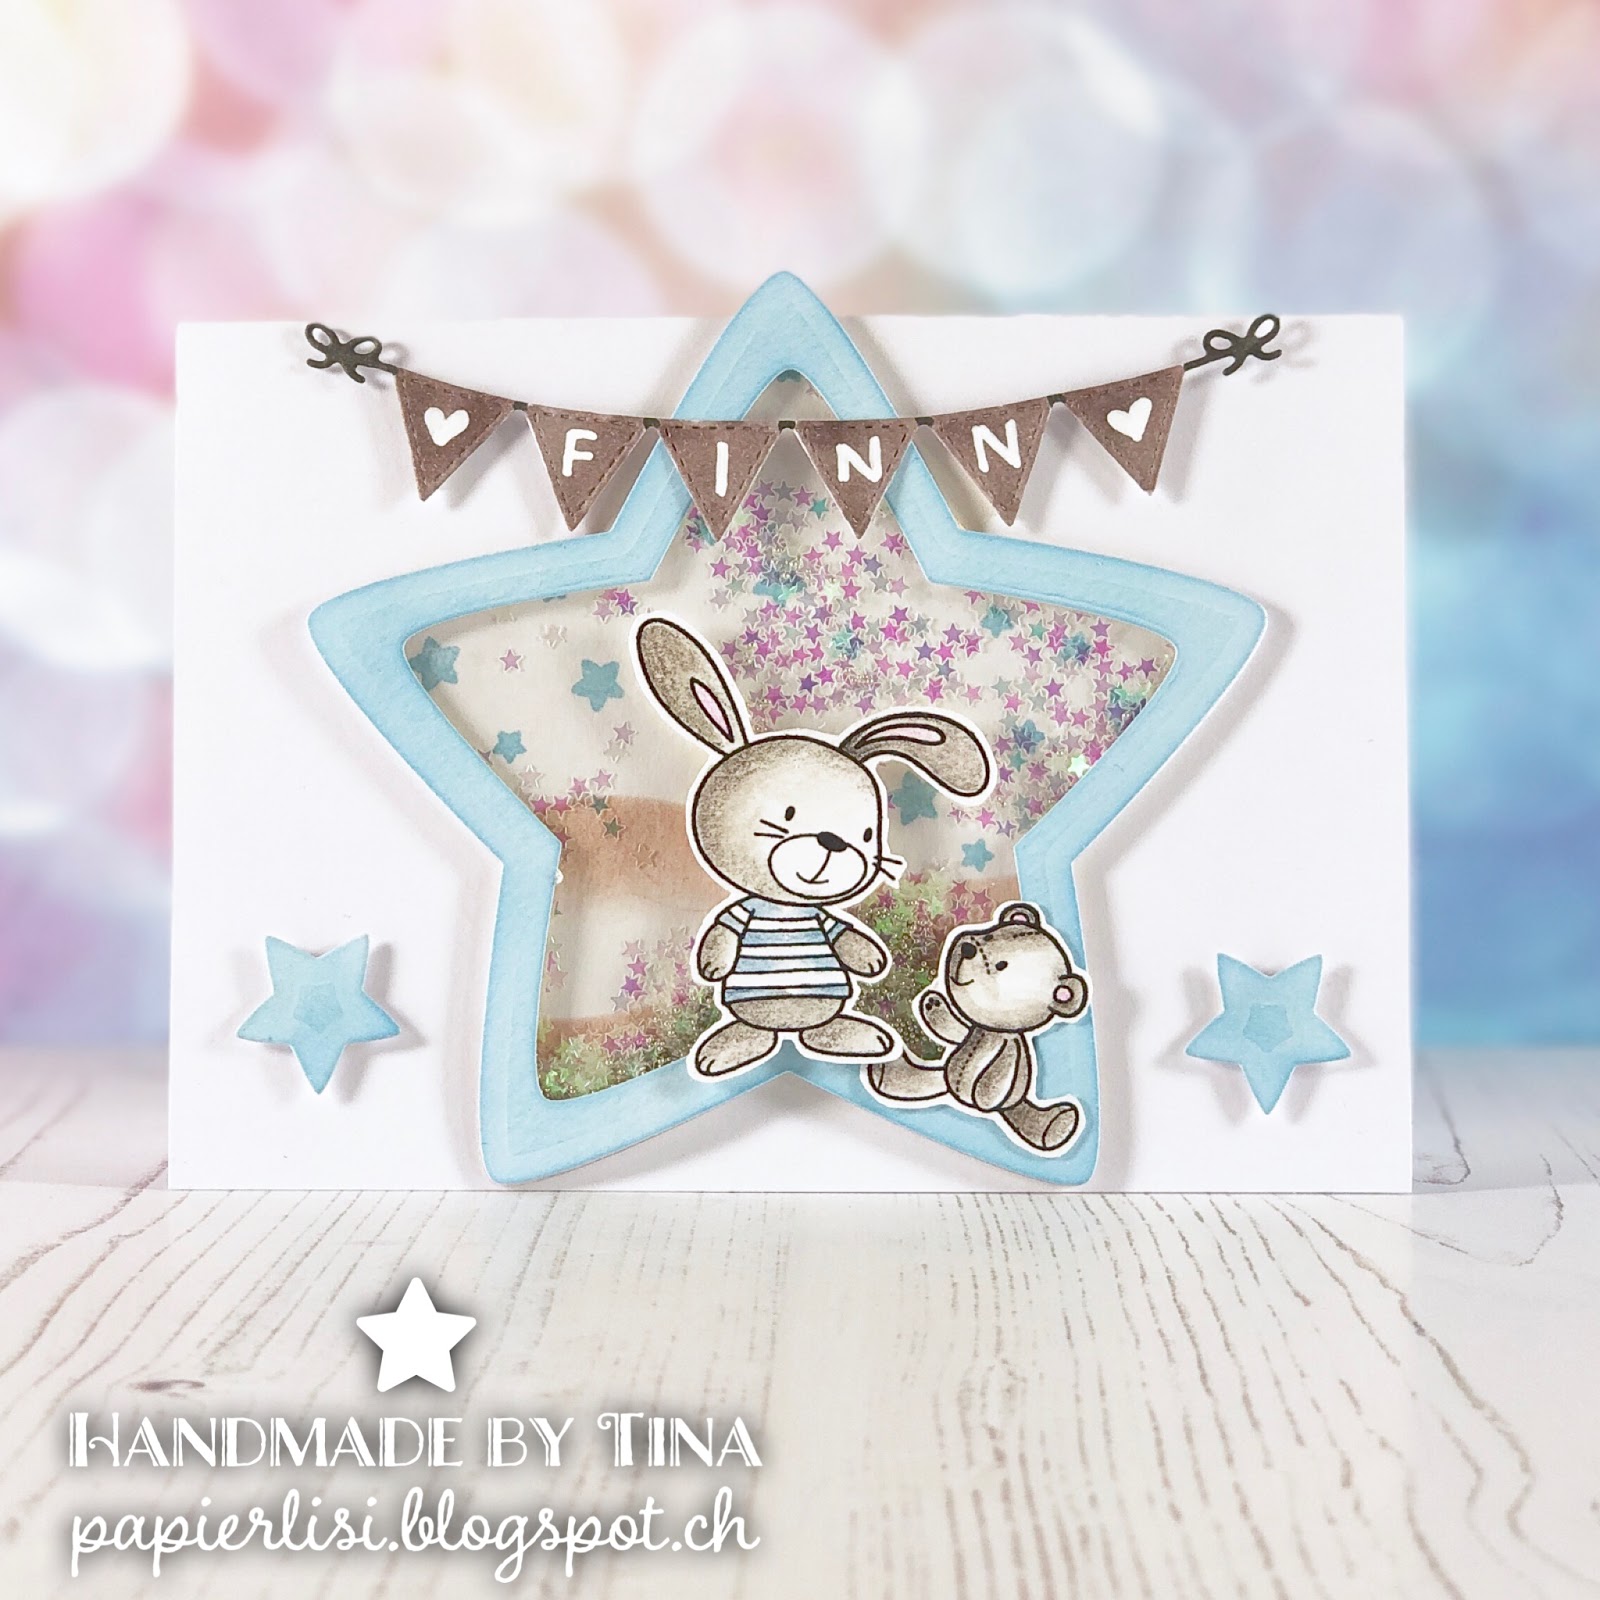
Today we are starting with a very creative Basteltraum challenge which is all about shakers and/or special shapes! I paired both themes on one card and created a shaker card with a star shape.

And it is easier than it looks, ha! :-)

I nested two star dies by Lawnfawn in to each other to create a star frame and diecut another piece with the bigger star die as a backside and one piece out of acetate for the shaker window. Be very careful when glueing the acetate onto the star frame, otherwise you will see the glue on the edges.

The background of the star is sponged with dye ink and the stars are stamped with pigment ink.

Then I flipped the window over, put some foamtape (I cut very thin stripes) around the the edges and treated them with some antistatic powder to prevent any stickiness on the sides - those microbeads can be a pain when they get stuck on the  foam tape :-)))

so now I put the backside veeery carefully onto my window and pressed it really well down. You need to make sure that the foamtape gets stick everywhere. I mean EVERYWEHRE. Otherwise, those darn microbeads will season your craft table, and your floor :-)))

For coloring the sweet bunny and its cuddly teddybear, I used some watersoluble colored pencils and a waterbrush.

The bunting is colored with copics - I used a same shade of brown to match the color of the bunny. The name of the boy is written with a white Copic marker.

Two diecut stars finished off my design on the card.

I hope you like this special shaker as I do and got inspired to give it a try, too! Special shapes really give the something extra to a card I think :-)


Happy crafting, enjoy your weekend!

Big hugs,


Thursday, November 15, 2018

Basteltraum's Challenge #71 Winter/Christmas


Hello, crafty friends!

Are you already in mood for Christmas? Well, to be honest, I am not. But this is the second card I made this year for Christmas and it kinda put me closer to it - and let's face it, there are only 39 days left - so I actually should hurry :-)))

And maybe the latest bastel-traum Challenge will bring you the right mojo for it - it's all about Christmas and/or winter themed cards.

My card is a pretty simple one. I used an embossing folder for a knitted background and stamped several leaves,  a pine cone and berries with layering stamps. I love this technique, you get such beautiful results in almost no time (comparing to traditional coloring :-) ).

I made my arrangement with some foam tape to achieve more depth. I think this design would be great for mass producing; although I hat mass producing, Christmas is the time of the year we all have to do it, right?? :-))

I hope I turned your Christmas mojo on, in case it was still absent and I would love to see you playing along with us!

Crafty hugs,


Sunday, October 28, 2018

Happy Insta Girls Halloween Blog Hop


Hello, crafty friends!

We, the Happy Insta Girls, did it again! An amazing Halloween blog hop :-) And the fun part is always, no one knows what he will get and from who. Only where to send a card and a sweet treat; like secret Santa :-)

So LOOK at this what I got from my super talented and sweet friend Anni! My jaw dropped when I opened the package this week; isn't her creation simply FANTABULOUS?!? These are the most spectacular alcohol ink backgrounds I have ever seen so far. And those monsters are absolutely adorable. The treat box even has my name on the back and a magnetic closure. I am totally wowed by this creation - even the chocolate lollies are spooktacular! Thank you again so much for this mastered Halloween surprise, Anni!! xxx And I blame you that I need now the whole range of alcohol inks , but I forgive you, lol :-)))


So let's see what I did for my friend Biggi :-)


I created a card with digital stamps by Isabel Cristina. I printed the images first on Copic friendly paper and colored all images with my Copic markers and some Polychromos pencils. Then I fussycut all images and set them aside. The sky is sponged with Distress Oxides and the moon is painted with regular watercolors. If you take a closer look you can see the moonlight reflexions on the roofs of the houses in the background. For this, I used a finger dauber and some white pigment ink to achieve those reflexions. The sentiment is lettered freehand with a Posca marker (because I haven't any Halloween sentiment as stamp, shame on me, lol :-) )

I thought those shiny, green chocolate nougat frogs are the perfect Halloween treat and I wanted them to stay put in the packaging box, so I mounted every single one with a piece of foam tape onto the tissue paper, which was taped onto the bottom of the packaging box, too. Yeap, I am a control freak :-)

I hope that my friend Biggi liked it and that I could make her smile :-)

So hop now over to Biggi's blog to see what she created - I bet it is AMAZING!

In case you got lost on the hop, on the very bottom you will find all girls again to jump in anywhere :-)

HAPPY HALLOWEEN!!


Tina <-- you are here

Monday, October 15, 2018

Basteltraum's Challenge #70: Fall/Halloween


Hello, fellow crafter!


Are you enjoying fall as much as I do?? We have such a marvelous October so far, a lot of sunshine and all the pretty colors on the trees are making me so happy!!!

So that's why I only stuck with the theme "fall", even though you can choose from Halloween and/or fall for the current bastel-traum challenge.

As I always need baby cards, I decided to make a autumnal baby card with its typical fall colors... The background is made of kraft cardstock and stamped with a wooden background stamp by Lawn Fawn and some dye ink, also by Lawn Fawn. I love this tone on tone look and it really looks like a piece of wood, right? :-)

I stamped some images from the stamp set "Mom + me", also by Lawn Fawn, which is perfect for baby cards because one owl holds its baby in its wings, so adorable!

I colored the owls with Copic markers and the treeds are sponged with Distress Oxides. Also the background got a little Oxides treat :-)

I diecut the background with a dotted rectangle die and diecut a circle, also with dotted stitching details on it. I adhered the inside of the circle, the grass part, with foam tape to achieve a bit of depht to the scene. The sky is glued with regular liquid glue, like all other parts, too.

the "welcome" die is by Paper Smooches and I diecut it twice - one time from vanilla cardsstock and one time from dark brown fun foam to give it a dimensional feel. I glued the sentiment down with Multi Matte Medium - I just love that stuff! You don't see any excess in case you put too much glue on it.

So I just had to adhere my panel onto a card base, which is a standard European A6 size card. I bought it with this pretty wavy edge in a local craft store around my area. I love the color, it is something in between of vanilla and off white.

I hope you got inspired and will play along with us!

Crafty hugs,


Saturday, September 15, 2018

Basteltraum's Challenge #69: Journey / Vacation


Hello, my friends!

How are you? The weather is getting a bit cooler and I already can see some glints of fall outside... it is just around the corner for sure :-D

Did you already have a big summer vacation? Or is it still ahead of you, maybe a nice late summer holiday in a warm destination? Yeap, I keep dreaming :-)))

But I created a colorful vacation card that totally reminds me of bright summer days, rainbows and popsicles. At least I got a vacation back on my card :-D

This month's challenge over at Bastel-Traum's blog is all about journey and/or vacation.

First I diecut a dotted rectangle with 220g standard paper for my panel to work on.

I sponged a light blue sky with pigment ink and diecut an village skyline e out of watercolor paper and colored the trees and houses with different dye inks by masking off the different buildings to achieve kind of a rainbow row of houses. This looks so cheerful, doesn't it?! Rainbows just make me happy.

The cute little airplane is colored with Copics and the heart shaped condensation trail is stamped with the same pigment ink that I used for the sky. The clouds are diecut and mounted with foam tape - like the airplane. This gives a nice dimension and depth to the card, I really like that.

I just popped my panel onto a white standard european A6 card and voilà, ready to send :-)

I hope you got inspired and will play along with us!

Big crafty hugs,


Wednesday, August 15, 2018

Basteltraum's Challenge #68: Work/School


Hello, crafty friends!

How are you? I bet you are all busy going back to work or preparing things for your kids returning to school... So the current Bastel-Traum Challenge is all about that - pretty handy, right? :-))

Since my little one has her first day at kindergarten next Monday, I thought it would be a nice gesture to send a card to her teacher - I mean it all starts for her again, too, right?? :-)

I used three different stamp sets - the one with the crafty tools is from NeatandTangled and is called "crafting is my jam", the other one is an ink splash stamp , also by NeatandTangled and the other one is by Mama Elephant and is called "Page Huggers". Don't they fit very nice together??

I tried to imitate kind of a blackboard (inlcuding some chalk dust by tapping baby powder on it, yeah :-) )  and the cute critters are "hugging" it from behind. The sentiment is a handlettering and means "All the best for kindergarten restart".

All images are colored with watersoluble pencils and the ink splash is stamped several times with distress oxides.

I think it turned out pretty cute and I hope I made the teacher's day :-))

I would love to see you playing along! Thank you for stopping by and have a great day!

Crafty hugs and take care,


Sunday, July 15, 2018

Basteltraum's Challenge #67 "Anything goes"


 Hey, crafty friends!

I hope you are all fine and enjoy your Sunday - hopefully with some crafting time included!! :)

Today I have something pretty special for you - it was an order for a 50st birthday. They told me that the woman, Heike, is originally from Germany but lives in Switzerland and for her birthday, she will get a voucher for a helicopter flight around the swiss alps. So that is what I came up with :-))

I diecut a pop up box card (it's the one from Lawnfawn) with all my needed pieces and 2 times a helicopter (an old die, I have no clue what brand it is). I colored the helicopter 2 times with colored pencils and glued them together. In between I put a piece of blue vellum for the windows and a thin strip of acetate (this is for mounting it in the middle of the card that it looks like it flies). The mountains are colored with acrylic paint - I painted several layers and let it dry in between to achive some depth and shadows. Then I started to decorate my box with Heike's name (the letters are from the set "Bottlecap letters" by MFT) and some clouds. Plus a heart, colored in german flag colors - like her name. I kinda had the feeling it needs to be like that, otherwise it was too much swissness on my box, hahaha :-)) Some diecut clouds (out of fun foam) and the number 50 finished off my design. Plus a little handlettering on the outside of the box :-)

By scrolling down on this post you will find some close-ups and some snapshots during the cardmaking process.

So this time the theme on bastel-traum's blog is "Anything goes". There is no excuse not to play along!!

Have fun, guys! I am excited to see your creations!

Hugs,


Friday, June 15, 2018

Basteltraum's Challenge #66 Hobby / Leisure


Hello, my crafty friends!

A new challenge on Basteltraum's blog is starting again and this time it's a real pleasure to play along - theme is "hobby/leisure" So you could get crafty about our awesome hobby! That's what I did at least, hehe :-))

So I thought I will create  a card for a crafty friend with some crafting bunnies on it (those adorable bunnies are a part of a digital stamp set btw). I colored everything with my copic markers and added some texture with colored pencils, a brown Stabilo pen and a white gelly roll pen. The sentiment stripe is also colored with a copic marker (BG11). As my crafty friend really likes teal hues, I decided to stamp the ink splatter in a matching color and sponged some of the same ink on the right corner for a little bit more contrast. The shaker window contains a mix of glitter, sequins and star confettis. To finish off my design, I applied some Nuvo drops (clear)  onto the white part on the card to kinda fill the empty space. I really like how it turned out with all the teal hues :-)

I hope you got inspired and will play along with us this month!

Happy crafting!

Hugs,


Tuesday, May 15, 2018

Bastel-Traum's Challenge #65 Rainbow / Fantasy


Hello lovelies

Today is a new challenge starting over at Bastel-Traum's blog with the theme rainbow and/or fantasy... Wohoo! Get aaaaall of your pretty colors out and start creating something colorful!!!

My inspiration card is made with an utterly adorable digial stamp created by Isabel Cristina - in case you fell in love with it too - it is a free digi that you can grab on her blog HERE :-)

I colored the image with my copic markers and the background is made with liquid watercolor ink "Ecoline" by Talens . First, I gave the watercolor paper a good wash with plain water and then dripped the color with the included pipette onto the wet paper. It's SO zen to watch the color spreading over the surface, love this process! :-) I repeated that process several times and dried the layers in between with my heat tool. Then I cut the watercolor paper with a scalopped rectangle die by Mama Elephant which is included in this set.

I adhered the mousie with some foam tape to stand even more out and finished off my design with some sparkly rhinestones by Lucy's little Things . Looks cute, right?? I think this card will make anyones day a bit brighter :-))

Thank you for stopping by - hopefully you got inspired and I will see you playing along!

Crafty hugs,


Sunday, April 15, 2018

Basteltraum's Challenge #64: Flowers / Mother's day


Hello, crafty friends!

I hope you are enjoying a great spring weekend as I do! Temperatures are getting so much warmer, you can do activities outside and nature is getting so colorful again! I think spring is my favorite time of the year :-))

And because Mother's day is coming soon, the theme of the newest Bastel-Traum challenge is all about Flowers and/or Mother's Day!

I grabbed an older set by Altenew called "Magnolias for her" and stamped it with a super light grey ink - you can barely see it when it's stamped. But it's enough for working with the "no-line" coloring technique - as it says - at the end you won't see any stamped lines anymore. I used my Schmincke Horadam watercolors with a wet-on-wet technique. In case you're looking for new, high quality watercolors, I really can recommend the HORADAM. They are incredibly pigmented, lightfast and sooo easy to blend!

I hope you will play along this month - you can go very colorful and festive! But for now we should enjoy the nice weather outside, don't you think?

Thank you for stopping by!

Crafty hugs,


Sunday, April 1, 2018

Happy Insta Girls: Easter Blog Hop


Happy Easter, lovelies!

I hope you will spend today time with your family, enjoying some egg hunting and just have a good time, gathered by your loved ones :-)

For this Easter, we organized a litte Easter blog hop amongst a bunch of amazing crafty friends to treat each other with an Easter card and some candies - what a lovely idea!

So if you are already following the blog hop, you might come from sweet Wiebke - and she treated me with an ADORABLE pop up box card which I love, love, loooove!! Look at all those cute details! Plus, she even added a little treat box for my little daughter. Her Easter happy mail was simply stunning, thank you again for it, Wiebke! xoxo


And now let's have a look what I created for sweet Claudia :-D As she is an amazing cardmaker who appreciates handmade cards a lot, I had to create a special one for her with my brand new Pivot pop up die set by Lawnfawn. That set is simply amazing and sooo clever! It creates every piece that you need for the mechanism and it even comes with lovely dies who help building up your scene. Lawnfawn has a great tutorial where you can see step by step how you need to fold and assemble all the pieces.


So for her I created a little egg hunting scene with digital stamps by Isabel - you might check her Etsy shop, she has so many amazing designs there! And they're all just a few bucks. I colored up all images with Copic markers and Polychromos pencils. The background on the pivot mechanism and the background is made with Distress oxides, the outside is a gingham background stamp by Simon Says Stamp. Oh, and the fluffy fur of the sheep is made with a Liquid Appliqué pen. I love that stuff - just apply it onto your project and then heat it up with your heat tool - voilà! You will have the most fluffy surface possible afterwards :-)))

I think this mechanism really makes a big impact for a card and I am happy how it turned out and that Claudia liked it :-)

So hop over to her blog to see what she created - I bet it will be amazing!

Crafty hugs and enjoy the rest of your Easter Sunday!


In case you got lost somewhere on the blog hop, I listed all the girls  for you who participated :-) :

                                  Tina <---yep, this is me :-)


Thursday, February 15, 2018

Basteltraum's Challenge #62: Party / Birthday


Hello, fellow crafter!

I hope you had a wonderful Valentine's Day and have been treated with some love and maybe some crafting supplies, huh??! :-)))

Today starts a new challenge over at bastel-traum's blog  which is all about party and/or birthday themes... I created this male card for a friend of mine which had his 50th birthday. And he is planning a big bike tour through the USA in 2020 and of course the route 66 will be a part of it... so my design was clear - it had to be something with it :-)

First, I googled for some pics by typing simply Route 66 in the search bar - and voilà, found that great perspective photography. I love the feeling from afar you get when looking at it :-) I grabbed a cross stitch square die and cut out a piece of my print. Then I diecut his name with letter dies by lawnfawn on top and turned it into a shaker card by filling it with micro beads. The sentiment is by inkadinkadoo and is white heat embossed. Here we go - a cool and personalized male birthday card in almost no time (most of the time took me to figure out the design, haha! As always :-) )

I hope you got inspired and you will play along with us!

Happy crafting!

Hugs,


Monday, January 15, 2018

Basteltraum's Challenge #61: Valentine/Love


Hello, crafty friends!!


As it is so much going on this week in my life, I kept my inspiration for you quite simple :-)) This time, bastel-traum's challenge is all about love and Valentine. I colored an image by Love Cynthia with my Copic markers and Polychromos pencils. Then I sponged some white pigment ink onto a craft cardstock piece and adhered the lovely image on the center. The sentiment is heat embossed with white embossing powder. One pink heart finished off my CAS design.  Here we go - that's all!!

Hopefully you will find some time to play along with us!

Have a great week and sending crafty hugs to you,


Friday, January 5, 2018

My very first cardmaking tutorial for a special occasion: it's Nicole's birthday!!


Hi everyone!!

Today is the birthday of a very sweet and dear crafting friend - Nicole Vögeli!! Happy happy birthday, sweetie!! I'm wishing you lots of happiness, cake and of course crafting time :-))

If you like to join me how I did this card, you can watch my very first cardmaking video here :)


Enjoy!

Oh, and I would love to hear what you're thinking of it :-) And please bear with me - my mother tongue is not English and that's why I have this swiss cheese accent :-)))

Have a great day!

Crafty hugs


On Instagram

© Papierlisi. Made with love by The Dutch Lady Designs.