Tuesday, December 15, 2020

Basteltraum's Challenge #96: Interactive and/or shaker card


Hello my crafty friends!


Can you believe it - 2020 is almost over! Where the heck has this year have been??! A lot of weeks just disappeared in a cloud of staying home, home office and social distancing... gah! But thankfully we are having a hobby that is virus safe, isn't it!!!


And so we are coming to the last challenge for this year, hosted by bastel-traum.ch!


This time, it is all about interactive and/or shaker cards!! Wohoo, this is such a fun one! Yes, I am a big fan of interactive cards, lol.


I created a pop up box card with lots and lots of colored images, all in a pretty pastel tone. I used copic markers, Polychromos pencils and glitter pens for coloring. The box itself is diecut out of patterned paper (spiffy speckles by Lawnfawn) and also the stamp sets are all by Lawnfawn (3 different ones, to be precise): unicorn picnic, a little sparkle and Frosty Fairy Friends.


Then I created an extra teeny tiny shaker out of a gift tag - because you know, I love going the extra mile for my cards :-) I filled it with glitter stars and micro beads for the extra shaky sound, I love that!


So I hope you got inspired and still find some time playing along with us - see you over there on bastel-traum's blog!


Thanks for stopping by and MERRY CHRISTMAS!!


Big squeezing hug from me to you,


Sunday, November 15, 2020

Basteltraum's Challenge #95: Winter


Hello, crafty friends!

I welcome you to the latest challenge over at bastel-traum's blog, and it is all about winter themed cards. YAY! I am truly ready for winter, what about you? I miss the cold air, we had so many hot days this year and I cannot wait for the first snow!! So at least on my card it already has arrived, lol.

I played with some products by Mamaelephant (dies and stamps). The background is cut with a backdrop die called "slim woodland" and the stamp set is called "Dashin thru the Snow". I colored all images with watercolor markers and watersoluble pencils and fussy cut them by hand afterwards.

Then I sponged a piece of watercolor cardstock with Disress oxides - with tumbled glass and blueprint sketch. I ADORE this combo! It gives such a nice blend! Then I spritzed some water onto the panel, waited a few seconds and pressed a paper towel on it for absorbing water and the lifted color. For the extra vibrant finish you might try to put a layer of Distress glaze (it's the same as Micro Glaze) - just rub it with your fingers over the panel, it makes it waterproof plus extra shiny and vibrant! Love it. Plus, in case you want to put nuvo drops on it, the drops won't stain anymore from the Distress oxides underneath, HA! :-)

The diecut piece is only sponged with a tint of "Minty Fresh" dye ink on the snowy slopes, the rest is plain white.

Then I glued the two pieces together, heat embossed the sentiment and glued some white dots (which are actually leftovers from the slim woodland diecut) as snowflakes onto the blue background. Then I mounted all my colored images with some foam tape on the panel as well. Voilà, there you go for a wintery, fun scene! :-)

By scrolling down you will find some pictures from the process - I hope it helps in case you want to try this, too!

Thank you for stopping by and see you over there at the challenge!

Happy crafting,


Thursday, October 15, 2020

Basteltraum's Challenge #94: Backgrounds


Hello everyone!


How are you? Are you enjoying the cooler days as much as I do? Beside having no more sweaty moustache (lol) you also find probably more time to craft, right? This is one reason why I love the cooler season of the year better, honestly!

So it's the mid of month again and that means a new challenge over at Bastel-Traum's blog has started! And this time it is all about backgrounds! Yay! I LOVE creating colorful backgrounds! Whether it is for scene building or just a pretty background for itself - it is so much fun playing with all the colors and techniques and and and..!

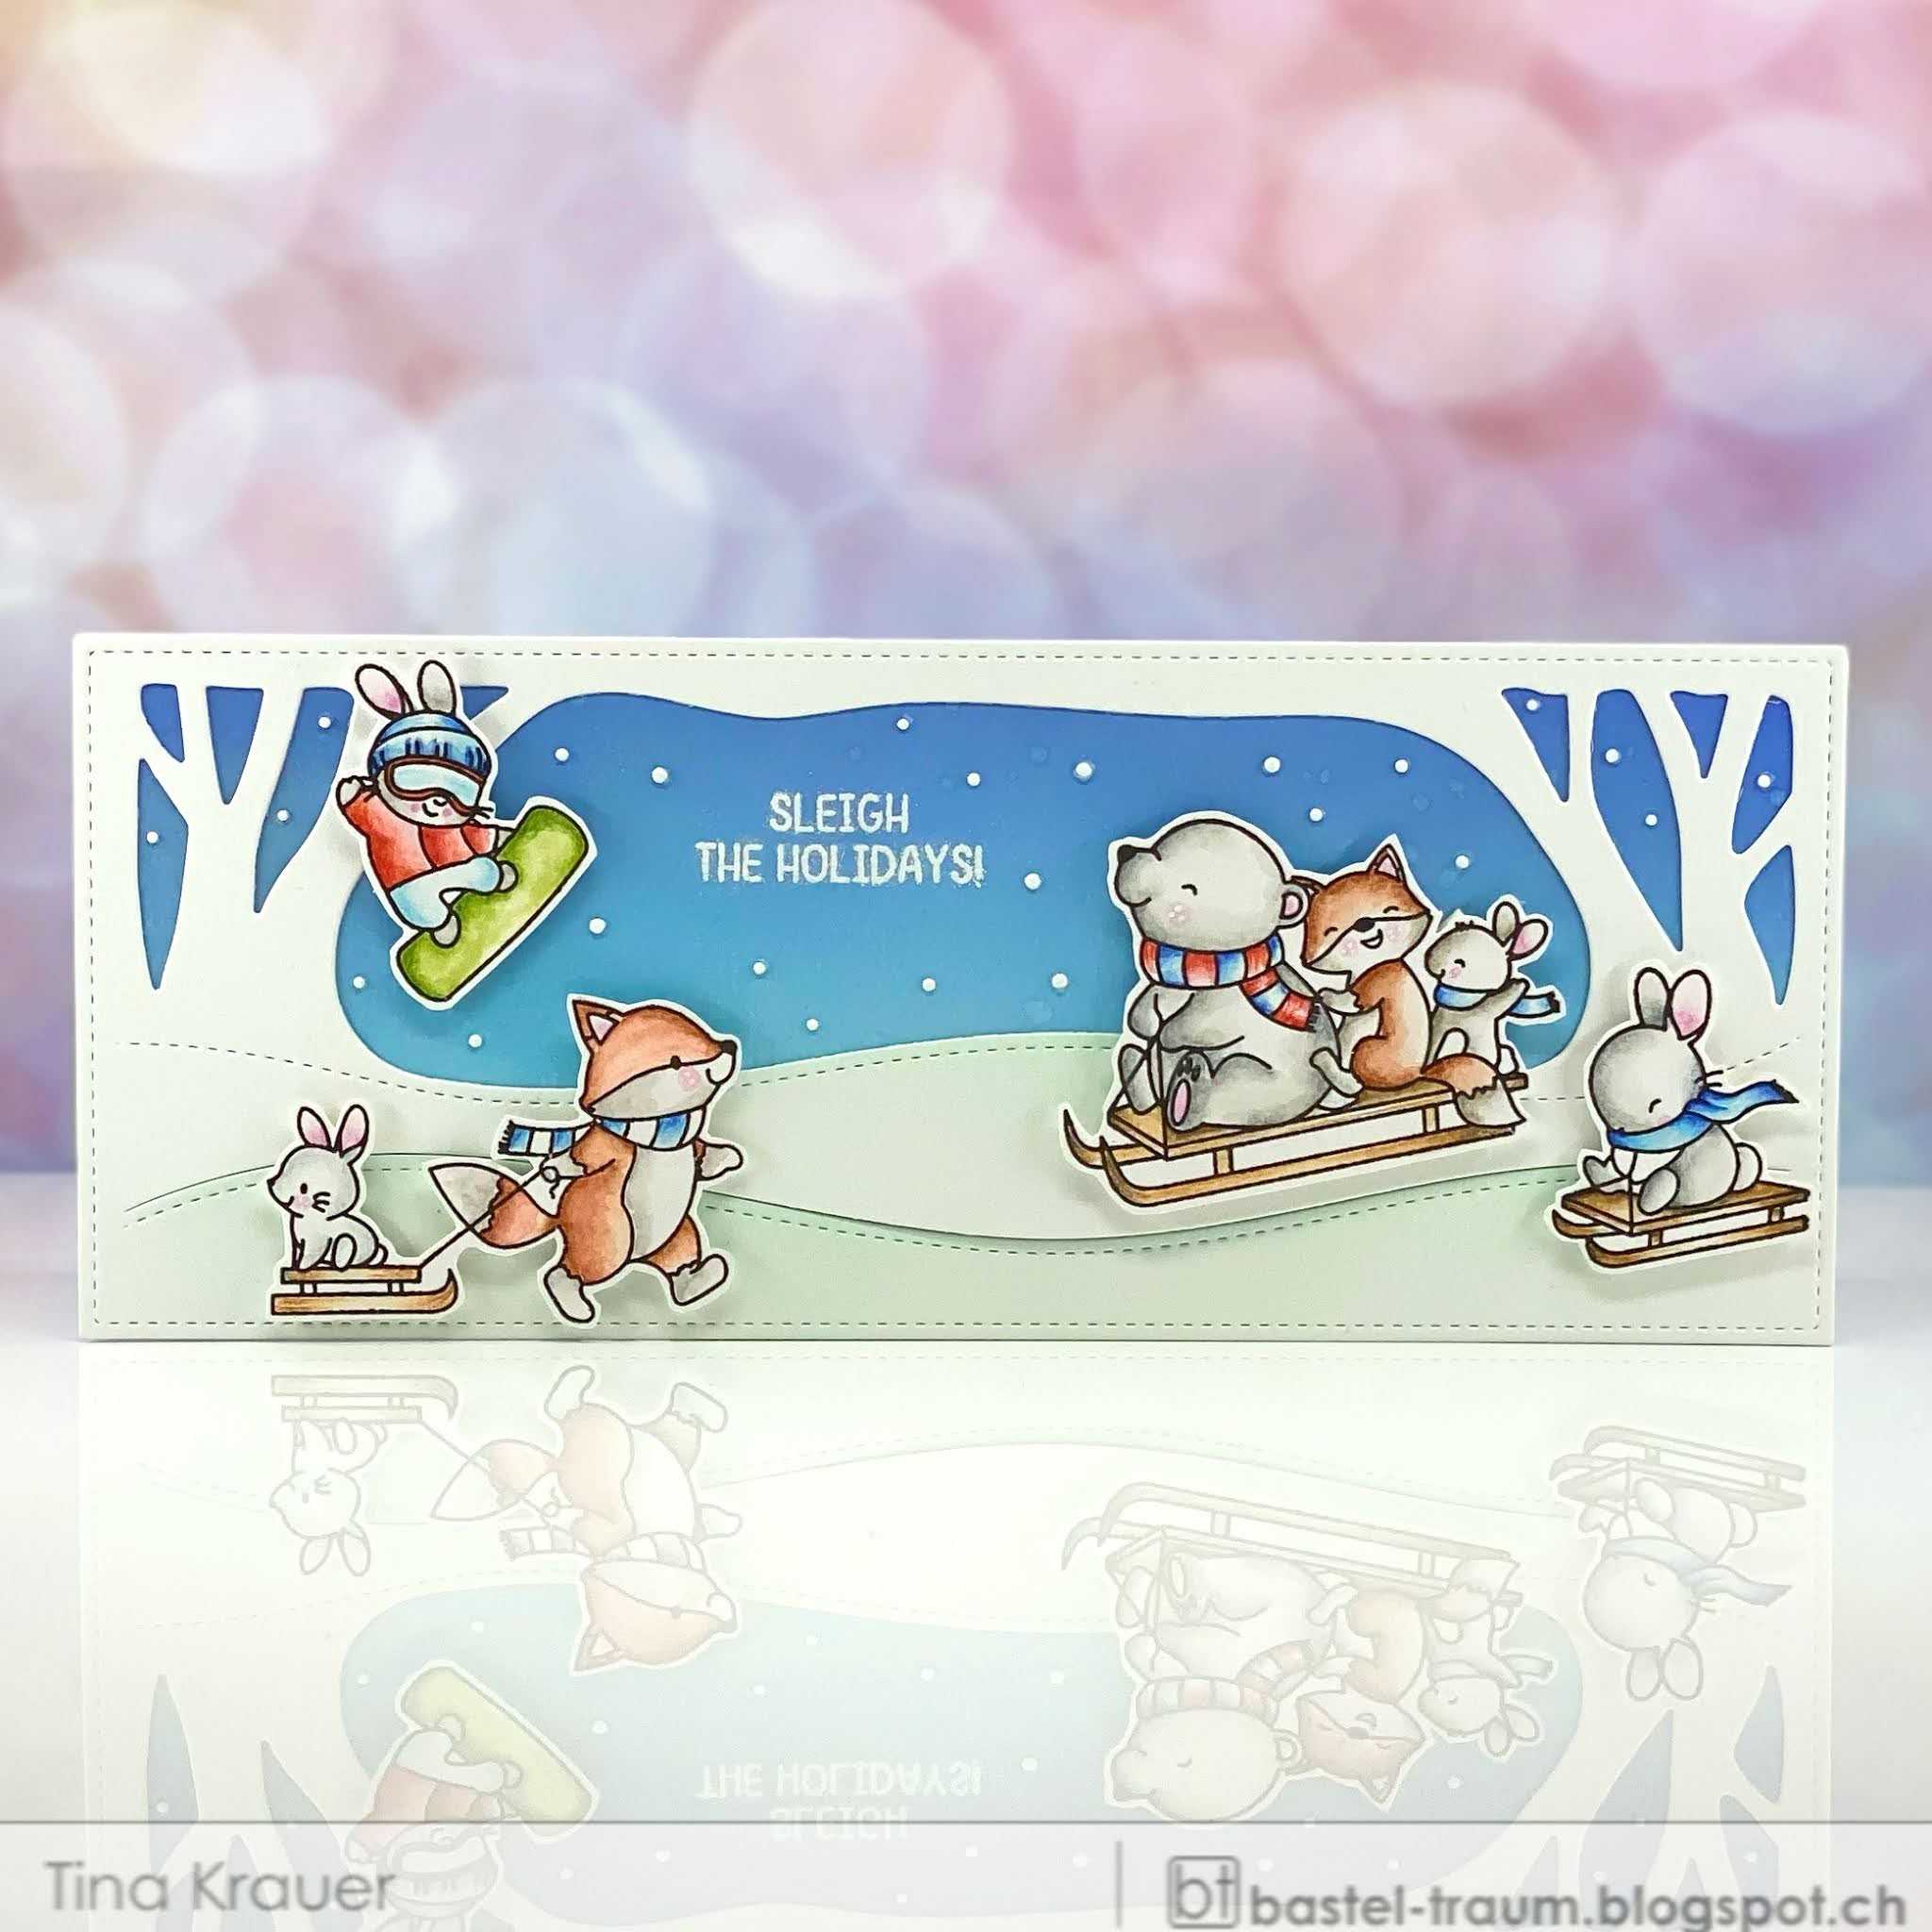
So my inspiration for you is a baby card with a background that I made with distress oxides, water, micro glaze and white acrylic putty cream - whew!! :-)

First, I brushed the Distress oxide colors (blueprint sketch and tumbled glass) onto my watercolor panel and spritzed some water droplets over it to lift off some ink. This gives a pretty texture. Then I dried it with my heat tool. Then -  and this is very important - I put a layer of micro glaze over the whole surface to seal the distress oxides. They react with any humid media, so you need to make sure the surface is sealed and won't react anymore with water or any humid media.  Then I continued with my white acrylic putty cream. I used a starry sky stencil to put the cream over 2 thirds of the whole panel. Thanks to the micro glaze, the putty cream stays pure white and won't react with the distress oxides underneath (or at least only a tiny bit, but it's not visible). Let it air dry, no heat tool here! You will risk brownish stars, ew! :-)


The cool thing is, you are able to scratch off some stars or dots after applying and drying, because the surface is pretty smooth due to the micro glaze (but no worry, the acrylic putty cream won't come off if you don't scratch it ;-) ) So you still can adjust the sky with less stars if you think it is too busy! I love that. So I scratched a few off to make it look less busy.


Then I placed my images (I colored them with regular watercolors) on my panel, also my "welcome" sentiment by Paper Smooches (it's an oldie, but still goodie, but as far as I know not available anymore), making sure I leave some space for vellum clouds. These clouds are my space holder. I will add the baby's name as soon as I know it :-) I folded the vellum around the edge of my panel and secured it at the back with some tape, and at the front I just glued it on 3 different little spots and covered the glue with some diecut stars. 


I hope you liked this little "how to" background tutorial and you will play along with us!


Happy crafting!


Hugs,


Tuesday, September 15, 2020

Basteltraum's Challenge #93: FALL


Hello my friends!


Fall is just waiting around the corner, can you feel it, too? Although the days are still pretty warm, you can tell it will arrive soon. I adore fall with all its colorful shades of yellows, oranges and reds! 

So the current bastel-traum challenge is all about it!

I stamped a tree with waterproof pigment ink onto a piece of watercolor paper. Then I colored a tiny leaves stamp with different watercolor markes and stamped them onto my tree. A waterbrush helped to spread the ink around my tree and blend in some harsh lines I might got from stamping. At the end I added some distress ink into the tree to brighten it up even more. The birdie and the swing are also stamped with waterproof pigment ink. Then I drew a little line to give the tree a ground and added some greenish color to it and blended it out with a water brush as well. To finish off my card, I stamped the sentiment with the same waterproof ink as the rest. Voilà, here we have a lovely fall greeting card - sometimes, simple is best :-)


I hope you will play along with us, see you there!


Enjoy fall and happy crafting!


Hugs,


Saturday, August 15, 2020

Basteltraum's Challenge #92 Clean and Simple


Hello everyone!

I cannot believe that already a month has passed again, whew! In two days, my little one will start with first grade, summer vacation are over and the days are going "back to normal".  The past weeks have been pretty hot, too hot for crafting.. but now it seems we get some breezy days, yay!

And the latest Bastel-Traum Challenge is so great to restart crafting because it is all about CAS - clean and simple! Easy peasy, right? Not much sweaty or complicated techniques involved, right? 

My inspiration card is just one tiny image colored, some cloud stenceling and a diecut rainbow with a cloud... the rainbow colors are made with copics onto white cardstock. Dies and stamp by Lawnfawn.

I hope you will play along with us - see you there over at Bastel-Traum's blog!

Crafty hugs, 


Wednesday, July 15, 2020

Basteltraum's Challenge #91 Anything Goes


Hello everyone,

I hope you are all well and can enjoy some nice summer days, somewhere outside and a sipping a cool drink :-)

As my left wrist is bothering me quite a bit, I kept it really simple for my card for the current Bastel-Traum Challenge. The theme this time is "anything goes"! So whatever you are working on - you can enter it to our challenge, yay!!

I brushed some distress oxides onto a piece of cardstock using a stencil by MFT and splattered some black liquid watercolor over it.

Then I dicut some letter balloons out of white cardstock and stamped them in some rainbow colors. I used foam tape to adhere them onto my panel.

The little mousie is from the "Really high five" set by Lawnfawn and I colored it with some Copics and fussy cut the hat and the mouse. The balloon strings are drawn by hand with a ruler and a fineliner pen. Then I adhered the mouse with some foam tape, too.

Some clay candies finished off my card design. Do you like it? I was not sure if the clay was too much, so I created an other one without these. Anyway, I hope you like them both and got inspired to play along!

Happy crafting!

Hugs,


Monday, June 15, 2020

Basteltraum's Challenge #90: Summer


Hello everyone

I hope things are going smoothly at your side! As we have a piece of "normality" back, I really look forward to summer! Although we don't travel anywhere, I am sure there are plenty of possibilities to enjoy summer around your area - as we do! :-)

This month's challenge hosted by Bastel-Traum is all about summer themed cards. I took it literally and created a card with a bunch of tropical leaves and a Copic colored flamingo (yes, I know I have colored lots of these througout the years, but I never get tired of them, haha ).

The background is brushed with distress oxides (squeezed lemonade and dried marigold) and I used a stencil by MFT and some teeny tiny star stamps to give the background more fizziness :-)

I diecut the summer sentiment 4 times of teal cardstock and stacked them together with glue for more dimension. The little "hello" sentiment is sponged with a tint of the same distress oxides as the background for bringing the whole design together.

I hope you got inspired and will play along with us this month!

Thank you for stopping by and - most importantly - happy crafting!!


Wednesday, April 15, 2020

Basteltraum's Challenge #88: Color combination


Hello crafty friends

How are you doing with all the craziness that is going on in our world?! Well, I am privileged as I have a safe home, all my loves are safe and sound at home too and we enjoy a lot of family time together. And of course we are crafting up a storm!! :-))

But for today I have another card inspriation for you. A new challenge started over at Bastel-Traum's blog and it is all about color combinations. You can choose from two different combos - I went with the pink one, of course, hahaha :-))

I sponged some Distress Oxide (Picked Raspberry)  onto a piece of watercolor cardstock that I diecut first with a dotted frame die. Then I stamped that cute flower stamp also on a scrap of watercolor paper and colored it with my Ecoline Brushmarkers. Then I wrapped some hemp cord around my panel to ground my little flower on the card. The flower itself is attached with some foam tape for more depth. The sentiment is stamped with Onyx Black Versafine ink. Some teeny tiny rhinestones (I always use these from the nail art supplies) finished off this pretty clean and simple card design.

I hope you got inspired and you will play along with us! Thank you for stopping by and spending some time with me.

Stay safe, stay home and happy crafting!


Saturday, February 15, 2020

Basteltraum's Challenge #86: Get well cards


Hi over there! :-)

I don't know about you, but it seems to be the season for flu, running noses and bad coughing, isnt' it?? So the latest Bastel-Traum challenge is the perfect theme this month - it's all about get well cards!

I went for an easy and quick design. It's a simple stamping party allover my whole card panel. I used some versafine ink on watercolor paper because I wanted to use my Faber Castell watercolor markers to color up the whole panel. A little nurse chickie and a white embossed sentiment on black cardstock finished off my design for this cute get well card... Although this mini stamp set is one of the older ones, I still love it!

I would love to see you playing along with us!

Thanks for stopping by!

Crafty hugs,


Wednesday, January 15, 2020

Basteltraum's Challenge #85: Monochrome / Glitter


Hello, crafty friend!

I hope you spent some relaxing days over the season and had a good start into the new Year!

We are starting this year's first challenge with a fun one - it's all about monochromatic and/or glitter schemes, yay!

I went for a teal monochromatic scheme; except the hair and skin is not in that color range. But the colors are so subtle and soft that it still looks monochromatic, doesn't it? :-D

First, I sponged a a birch tree background over a lovely stencil with some distress oxides ink (evergreen bough and tumbled glass) and adhered a piece of paper diecut as a snow bank for my ground.

Then I colored all my images from this Lawnfawn set with my copic markers and at the end I added a lot of glitter with my Wink of Stella pen and my diamond ice stickles bottle (along the snow bank, the dresses and the ear muffs, the roofs and the window sill) for the extra amount of shininess, ha! :-)

I heat embossed the sentiment with bridal tinsel embossing powder, it is oooh-so sparkly, love it!! I love how the sentiment kinda hides in the birch trees...

The images are mounted with foam tape onto the panel for more depth. As a finishing touch, I added some snow flakes with my Nuvo Crystal drops (gloss white).

I hope you got inspired and will play along with us - and good luck!

Thanks for stopping by and hanging out with me!

Crafty hugs,


On Instagram

© Papierlisi. Made with love by The Dutch Lady Designs.